1. Create a folder "c:\training"
2. Download JDK version 1.7 for OS 32-bit/64-bit for JAVA
a) URL: http://www.oracle.com/technetwork/java/javase/downloads/index.html
b) Download jdk-7u25-windows-x64.exe in folder "training"
c) Create a folder "java" in folder "training"
3. Install Java
a) Click jdk-***.exe to install java
b) Give installation directory as C:\training\java
4. Download and Install Cygwin for OS 32-bit/64-bit
a) URL: http://www.cygwin.com
b) Click setup-x86_*.exe to download and install Cygwin
c) Create a folder "cygwin64" in folder "training" -> "C:\training\cygwin64\"
d) Follow instructions in Section "7.3 Installing Cygwin"at "http://docs.oracle.com/cd/E24628_01/install.121/e22624/preinstall_req_cygwin_ssh.htm" to install Cygwin.
Run the setup executable, then click Next to proceed.
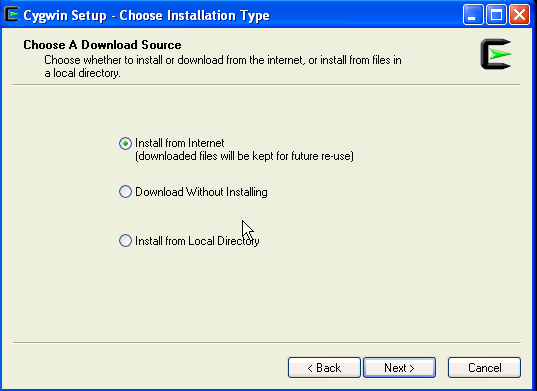
On the Choose Installation Type screen, select Install from Internet, then click Next.
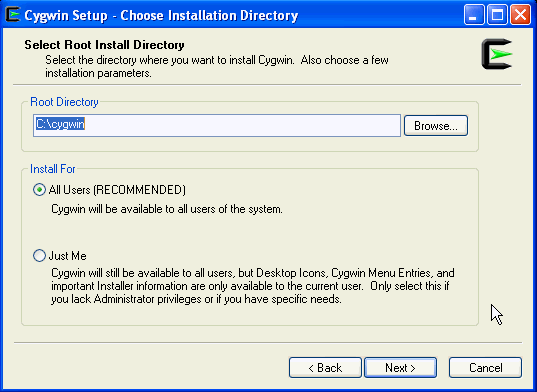
On the Choose Installation Directory screen, enter C:\training\cygwin64\ as the Root Directory, then click Next.
On the Select Local Package Directory screen, select a directory on your local machine C:\training\package\ where you want to store the downloaded installation files, then click Next.

On the Select Connection Type screen, select appropriate settings to connect to the internet, then click Next.

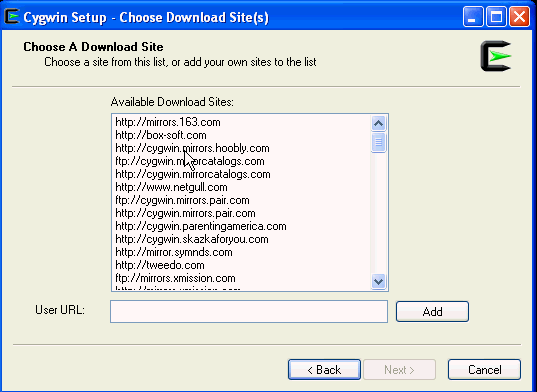
On the Choose Download Site(s) screen, select any site from the available list, then click Next.
Add following packages for installation: openssh, openssl, unzip, zip
On the select packages screen, ensure that you select the following packages, then click Next:
From the Archive category, select
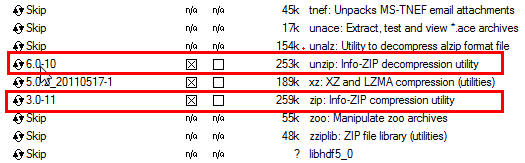
From the Net category, select

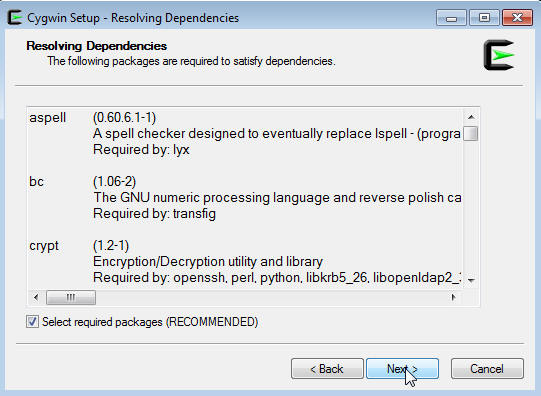
After selecting the packages and clicking Next, the Resolving Dependencies screen is displayed. Click Next to proceed.
5. Setup and Start SSHD daemon
a) Follow steps 1-3 for Section "7.4 Configuring SSH after installing Cygwin" of "http://docs.oracle.com/cd/E24628_01/install.121/e22624/preinstall_req_cygwin_ssh.htm".
b) Navigate to the
*** Query: Enter the value of CYGWIN for the deamon: [] bin mode ntsec
f)*** Query: Do you want to use a different name? no
g) *** Query: Create new privileged user account 'cyg_server'? (yes/no) yes
h) If the SSH daemon does not start up, view the
2. Download JDK version 1.7 for OS 32-bit/64-bit for JAVA
a) URL: http://www.oracle.com/technetwork/java/javase/downloads/index.html
b) Download jdk-7u25-windows-x64.exe in folder "training"
c) Create a folder "java" in folder "training"
3. Install Java
a) Click jdk-***.exe to install java
b) Give installation directory as C:\training\java
4. Download and Install Cygwin for OS 32-bit/64-bit
a) URL: http://www.cygwin.com
b) Click setup-x86_*.exe to download and install Cygwin
c) Create a folder "cygwin64" in folder "training" -> "C:\training\cygwin64\"
d) Follow instructions in Section "7.3 Installing Cygwin"at "http://docs.oracle.com/cd/E24628_01/install.121/e22624/preinstall_req_cygwin_ssh.htm" to install Cygwin.
Run the setup executable, then click Next to proceed.
On the Choose Installation Type screen, select Install from Internet, then click Next.
On the Choose Installation Directory screen, enter C:\training\cygwin64\ as the Root Directory, then click Next.
On the Select Local Package Directory screen, select a directory on your local machine C:\training\package\ where you want to store the downloaded installation files, then click Next.
On the Select Connection Type screen, select appropriate settings to connect to the internet, then click Next.
On the Choose Download Site(s) screen, select any site from the available list, then click Next.
Add following packages for installation: openssh, openssl, unzip, zip
On the select packages screen, ensure that you select the following packages, then click Next:
From the Archive category, select
unzip and zip as follows:From the Net category, select
openssh and openssl as follows:After selecting the packages and clicking Next, the Resolving Dependencies screen is displayed. Click Next to proceed.
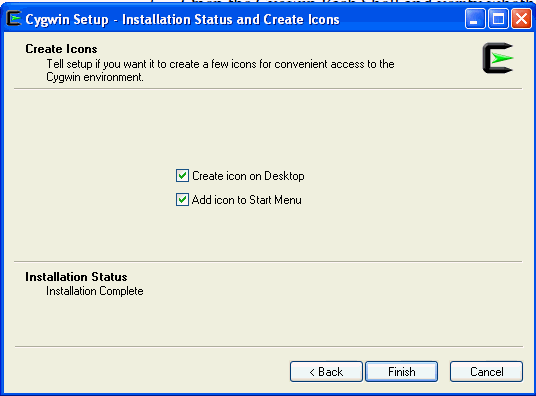
On the Installation Status and Create Icons screen, do not make any changes. Click Finish to complete the installation process.
5. Setup and Start SSHD daemon
a) Follow steps 1-3 for Section "7.4 Configuring SSH after installing Cygwin" of "http://docs.oracle.com/cd/E24628_01/install.121/e22624/preinstall_req_cygwin_ssh.htm".
b) Navigate to the
~\training\cygwin64\ directory, right-click the cygwin.bat file and select Run as administrator.
c) For question, if privilege separation should be used, answer no.
*** Query: Should privilege separation be used? <yes/no>: Nod) For question, if sshd should be installed as a service, answer yes.
*** Query: Do you want to install sshd as a service?
*** Query: <Say "no" if it is already installed as a service> <yes/no>: yes
e)*** Query: Enter the value of CYGWIN for the deamon: [] bin mode ntsec
f)*** Query: Do you want to use a different name? no
g) *** Query: Create new privileged user account 'cyg_server'? (yes/no) yes
*** Query: Please enter the password:*** Query: Renter:
If the configuration is successful, you will see the following message:
Host configuration finished. Have fun!h) To start Cygwin SSHD
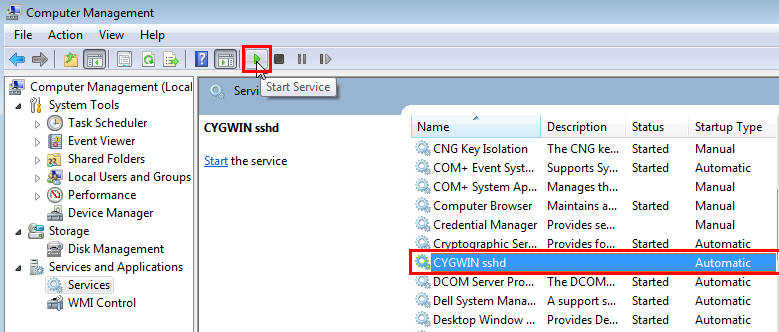
Perform these steps:
- Right-click on My Computer, and select Manage.
- In the Computer Management dialog box that appears, go to Services and Applications, and select CYGWIN sshd.
- Click CYGWIN sshd, then click the Start button.
h) If the SSH daemon does not start up, view the
c:\cygwin\var\log\sshd.log file for information on why the start up failed.
i) To test ssh
> ssh localhost
Password:
6. Setup passphraseless ssh so that password is not required
If you cannot ssh to localhost without a passphrase, execute the following commands:
$ ssh-keygen -t dsa -P '' -f ~/.ssh/id_dsa
$ cat ~/.ssh/id_dsa.pub >> ~/.ssh/authorized_keys
$ ssh-keygen -t dsa -P '' -f ~/.ssh/id_dsa
$ cat ~/.ssh/id_dsa.pub >> ~/.ssh/authorized_keys
Test:
>ssh localhost
No password required this time
6. Download and Install Hadoop 1.2.1 for Single Node
a) URL: http://apache.mesi.com.ar/hadoop/common/hadoop-1.2.1/hadoop-1.2.1.tar.gz
Download it in C:\training\
Other urls : http://apache.mesi.com.ar/hadoop/common/
b) Unzip the hadoop-1.2.1.tar.gz in C:\training
c) Edit following configuration files
c.1) Add following to c:\training\hadoop-1.2.1\conf\core-site.xml
<configuration>
c.2) Add following to c:\training\hadoop-1.2.1\conf\hdfs-site.xml
<configuration>
c.3) Add following to c:\training\hadoop-1.2.1\conf\mapred-site.xml
<configuration>
a) Set JAVA_HOME in Windows
Create a new variable JAVA_HOME as follows: Right-click on My Computer and go to Properties. In the System Properties window, click Advanced. In this tab, click Environment Variables. Then Add a User Variable JAVA_HOME.
Variable Name: JAVA_HOME
Variable Value: C:\training\java\jdk_1.7.0_21

b) Set JAVA_HOME in Cygwin
b.1) On Cygwin command line, type
export JAVA_HOME=/cygdrive/c/training/java/jdk_1.7.0_21 ( Linux style path name)
or
export JAVA_HOME=c:\\training\\java\jdk_1.7.0_21 (Notice the use of two \\ to give path)
b.2) Add the export command in ~/.bashrc
c) Set JAVA_HOME in hadoop scripts
or
JAVA_HOME=$JAVA_HOME ( As it was exported in shell )
8. Start Hadoop
Download it in C:\training\
Other urls : http://apache.mesi.com.ar/hadoop/common/
b) Unzip the hadoop-1.2.1.tar.gz in C:\training
c) Edit following configuration files
c.1) Add following to c:\training\hadoop-1.2.1\conf\core-site.xml
<configuration>
       <property>
         <name>fs.default.name</name>
         <value>hdfs://localhost:9000</value>
       </property>
      </configuration>
c.2) Add following to c:\training\hadoop-1.2.1\conf\hdfs-site.xml
<configuration>
       <property>
         <name>dfs.replication</name>
         <value>1</value>
       </property>
     </configuration>
c.3) Add following to c:\training\hadoop-1.2.1\conf\mapred-site.xml
<configuration>
       <property>
         <name>mapred.job.tracker</name>
         <value>localhost:9001</value>
       </property>
     </configuration>
7. Setup JAVA_HOMEa) Set JAVA_HOME in Windows
Create a new variable JAVA_HOME as follows: Right-click on My Computer and go to Properties. In the System Properties window, click Advanced. In this tab, click Environment Variables. Then Add a User Variable JAVA_HOME.
Variable Name: JAVA_HOME
Variable Value: C:\training\java\jdk_1.7.0_21

b) Set JAVA_HOME in Cygwin
b.1) On Cygwin command line, type
export JAVA_HOME=/cygdrive/c/training/java/jdk_1.7.0_21 ( Linux style path name)
or
export JAVA_HOME=c:\\training\\java\jdk_1.7.0_21 (Notice the use of two \\ to give path)
b.2) Add the export command in ~/.bashrc
c) Set JAVA_HOME in hadoop scripts
Edit C:\training\hadoop-1.2.1\conf\hadoop-env.sh to set JAVA_HOME
JAVA_HOME=/cygdrive/c/training/java/jdk_1.7.0_21or
JAVA_HOME=$JAVA_HOME ( As it was exported in shell )
8. Start Hadoop
Format a new distributed-filesystem:
$ /cygdrive/c/training/hadoop-1.2.1/bin/hadoop namenode -format
$ /cygdrive/c/training/hadoop-1.2.1/bin/hadoop namenode -format
Start the hadoop daemons:
$ /cygdrive/c/training/hadoop-1.2.1/bin/start-all.sh
$ /cygdrive/c/training/hadoop-1.2.1/bin/start-all.sh
The hadoop daemon log output is written to the ${HADOOP_LOG_DIR} directory (defaults to ${HADOOP_HOME}/logs).
Browse the web interface for the NameNode and the JobTracker; by default they are available at:
- NameNode - http://localhost:50070/
- JobTracker - http://localhost:50030/
Stop the hadoop daemons:
$ /cygdrive/c/training/hadoop-1.2.1/bin/stop-all.sh